Friday, November 26, 2010

FILESTREAM storage in SQL 2008 with ASP.net MVC Part 1/2


The FILESTREAM feature of SQL Server 2008, which allows storage of and efficient access to BLOB data using a combination of SQL Server 2008 and the NTFS file system. It covers choices for BLOB storage, configuring Windows and SQL Server for using FILESTREAM data, considerations for combining FILESTREAM with other features, and implementation details such as partitioning and performance.

1. Enable FILESTREAM support

To enable FILESTREAM support, run the following SQL:

On  SQL Server 2008 Express:


USE master;
EXEC sys.sp_configure N'filestream access level', N'2'
GO
RECONFIGURE WITH OVERRIDE
GO


On SQL Server 2008 Enterprise :


exec [sp_filestream_configure] @enable_level = 3;


This command enables or disables the support according to the parameter. The value 3 means that FILESTREAM will be enabled for Transact-SQL, local file system access, and remote file system access.

2. Create a database with a File Group that contains FILESTREAM

To create a database instance with a file group that contains FILESTREAM, run the following sql command. This creates the database with 3 file groups, but only one of them contains FILESTREAM as you can see in the command.

CREATE DATABASE CSAFMS
ON
PRIMARY (
    NAME = CSAFMS_Primary,
    FILENAME = 'D:\Databases\CSAFMS\CSAFMS.mdf'),
FILEGROUP FileStreamGroup CONTAINS FILESTREAM (
    NAME = FileManagement_FileGroup,
    FILENAME = 'D:\Databases\CSAFMS\CSAFMS')
LOG ON ( NAME = FileManagement_Log,
    FILENAME = 'D:\Databases\CSAFMS\CSAFMSLog.ldf')
GO


This command will create the following directories structure:
In the Data Directory, I could find the files specified above:
and in the CSAFMS directory, I could find the following content:

3. Create a Table with FILESTREAM

Note: FILESTREAM is not a type of a column, but it is a property you put on a varbinary(max) column.
So, in order to create a table with a varbinary(max) column that will be used for FILESTREAM, run the following command. Note that I don't have any additional columns to the file itself.


CREATE TABLE [dbo].[Files]

(
      FileID uniqueidentifier NOT NULL ROWGUIDCOL PRIMARY KEY,
      FileName Varchar(300) NOT NULL,
      Length bigint NOT NULL,
      FileContents varbinary(max) FILESTREAM DEFAULT NULL

)


4. Add Test Data

In order to get the feeling of the experience of working with files, let add an empty file:

insert into Files
(FileID,[FileName],Length,FileContents)
values (newid(),'Dummy File 2',0, CAST ('my test file' as varbinary(max)));


If we now query the database to see the files in it:

select * from Files


We will get the following result (the GUID will probably be different...)


FileID                               FileContents
------------------------------------ ------------------------------------------------
8247CE78-74DF-4BDE-A08D-9760AE0B1555 my test file

and If we look at the FileManagement directory, we can see that a new directory has been created
 

Wednesday, October 20, 2010

.Net Framework remote cleanup and installation

There are several reasons that lead to the corruption of installed .Net Framework on a machine running Microsoft Windows operating system, corruption of .Net Framework could leads to initiation failure problem for .Net Framework dependent applications like KBOX Agent and KBOX Agent debugger.


However this problem could be solved by uninstalling all versions of .Net Framework from effected machine and reinstalling .Net Frame required versions.

In some corruption cases, .Net Framework got corrupted in such a way that cannot be fixed by regular reinstallation procedure, or uninstall/reinstall ends up with an exception message.

This post describes how to encounter such .Net Framework corruption issue and get KBOX Agent running on client machines. This post describes the use of tools and procedures that can fix a local machine as well as large number of machines on remote locations, by using authenticated remote cleanup of corrupt .Net Framework version and push installation of .Net Framework version 1.1 that is prerequisite for KBOX Agent.


Problem Identification

From a KBOX administrator prospective, you may experience that some of the clients are not get connected for a long period of time, or clients are connected but are not getting refreshed inventory for an abnormal period of time.
If you can get an active ICMP response (PING response) then, it could be a corrupted .Net framework issue.

Solution

There are several .Net framework version could be installed and corrupted on a client machine, to fix the issue we must have to uninstall all of them in descending order of version number then install .Net Framework 1.1, that is prerequisite for KBOX Agent.
For remote cleanup of .Net Framework you need:
  • A shared folder on network that is accessible for target client machine
  • Target client machine Administrative access
  • A source machine to initiate the remote cleanup and reinstall process
  • Attached SharedFolder.rar
  • Attached SourceMachine.rar
  • WinRAR application to extract attached files


Steps

  1. Extract SharedFolder.rar to the network shared folder, make sure that target client machine can access the files on shared folder without any requirement to enter access credentials (you can accomplish it by granting Read Permission to Everyone Group).
  2. Extract SourceMachine.rar to any drive of your machine.
  3. Double click and run PSExec.exe and accept the agreement.
  4. PING target machine to ensure connectivity.
  5. Run following commands on windows command line after changing directory to SourceMachine.rar folder, after replacing sample values with real values (You must have run the following command in descending order of .Net Framework versions, each of the command written below may run up to several minutes, please be patient)


Sample ValueDescription to change the sample value to real value
192.168.1.209Target client machine’s IP address or DNS Name
TEST4SIGHT\administratorDomain Name\User Name (User must have administrative access on target machine)
123456Password of above mentioned user
dc1Shared folder machine’s IP address or DNS Name
framework_cleanupFolder network share name where you extracted the SharedFolder.rar


To Cleanup .Net Framework 4.0

D:\>psexec \\192.168.1.209 -u TEST4SIGHT\administrator -p 123456 \\dc1\\framework_cleanup\cleanup11.bat

To Cleanup .Net Framework 3.5

D:\>psexec \\192.168.1.209 -u TEST4SIGHT\administrator -p 123456 \\dc1\\framework_cleanup\cleanup35.bat

To Cleanup .Net Framework 3.0

D:\>psexec \\192.168.1.209 -u TEST4SIGHT\administrator -p 123456 \\dc1\\framework_cleanup\cleanup30.bat

To Cleanup .Net Framework 2.0

D:\>psexec \\192.168.1.209 -u TEST4SIGHT\administrator -p 123456 \\dc1\\framework_cleanup\cleanup20.bat

To Cleanup .Net Framework 1.1

D:\>psexec \\192.168.1.209 -u TEST4SIGHT\administrator -p 123456 \\dc1\\framework_cleanup\cleanup11.bat

To Cleanup .Net Framework 1.0

D:\>psexec \\192.168.1.209 -u TEST4SIGHT\administrator -p 123456 \\dc1\\framework_cleanup\cleanup10.bat

Result

If cleanup tool find the targeted version of .Net Framework on target machine it will normally uninstall it and give Error Code 0 on console (see below):
\\dc1\\framework_cleanup\cleanup11.bat exited on 192.168.1.209 with error code 0
If you get other error codes it means that Framework is failed to uninstall due to absence of targeted version or some program is currently using it, you may try this command on a later time when machine is idle and no application is running, you can restart that machine to close all running application forcefully.

  1. Run following commands on windows command line after changing directory to SourceMachine.rar folder, after replacing sample values with real values


Sample ValueDescription to change the sample value
192.168.1.209Target client machine’s IP address or DNS Name
TEST4SIGHT\administratorDomain Name\User Name (User must have administrative access on target machine)
123456Password of above mentioned user
192.168.1.200KBOX server’s IP address or DNS Name

Note: Following command may run up to several minutes, please be patient.

psexec \\192.168.1.209 -u TEST4SIGHT\administrator -p 123456 \\192.168.1.200\client\agent_provisioning\windows_platform\dotnetfx /q /c:"install /q"

Result

If push install command normally install .Net Framework, it will Error Code 0 on console (see below):
\\192.168.1.200\client\agent_provisioning\windows_platform\dotnetfx exited on 192.168.1.209 with error code 0.
  1. Open KBOX web administration portal and initiate push agent process on target machine

Thursday, October 14, 2010

Domain Driven Design (DDD) implementation using C# and LINQ

The part of the software that specifically solves problems from the domain model usually constitutes only a small portion of the entire software system, although its importance is disproportionate to its size. To apply our best thinking, we need to be able to look at the elements of the model and see them as a system.We must not be forced to pick them out of a much larger mix of objects, like trying to identify constellations in the night sky.We need to decouple the domain objects from other functions of the system, so we can avoid confusing domain concepts with concepts related only to software technology or losing sight of the domain altogether in the mass of the system. Domain-Driven Design: Tackling Complexity in the Heart of Software, by Eric Evans 
(Addison-Wesley, 2004)

Aggregates and Simplification
The DDD way to break down this complexity is to arrange domain entities into groups
called aggregates.
Each aggregate has a root entity that defines the identity of the whole aggregate, and acts
as the “boss” of the aggregate for the purposes of validation and persistence. The aggregate is
a single unit when it comes to data changes, so choose aggregates that relate logically to real
business processes—that is, the sets of objects that tend to change as a group (thereby embedding
further insight into your domain model).
Objects outside a particular aggregate may only hold persistent references to the root
entity, not to any other object inside that aggregate (in fact, ID values for non-root entities
don’t even have to be unique outside the scope of their aggregate). This rule reinforces
aggregates as atomic units, and ensures that changes inside an aggregate don’t cause data
corruption elsewhere.

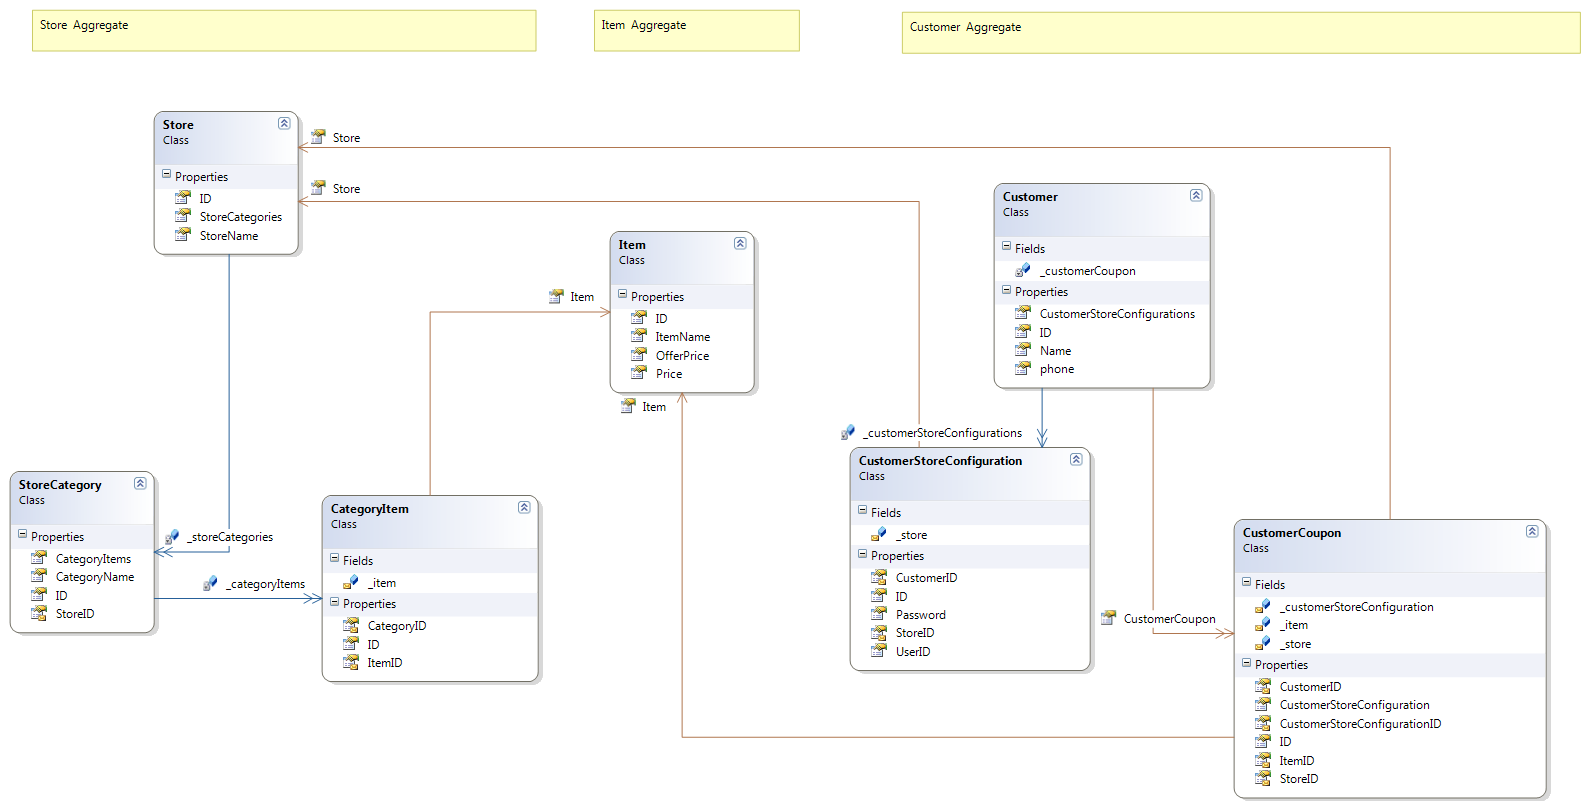
In our example we have 3 aggregates (Customer,Store and Item)


code file password (asadyousufi.blogspot.com)

Tuesday, April 20, 2010

Creating a Video Sharing Library


First step to create a video sharing library we need to have all videos in a FLV flash format in order to play them on webpage,
Sounds familiar, yeah the famous youtube.com does that, how exactly we can do something similar to youtube?

 How to convert files uploaded by people in FLV format?


There are different open source tools available for converting different formats of videos to other formats, unfortunately there are issues and bugs in these tools, and less support,  we can not use one tool for convert videos in FLV format, we have to mix two different tools for this purpose, below are the steps how can we achieve that using FFMPEG and FLVTOOL.

Step # 1:

Download FFMPEG (search it on Google, download it build it)
Download FLVTOOL (search it on Google, download it build it)
Or simply download my pre build copy from
·    
http://www.filefactory.com/file/b131a99/n/sample.3gp
http://www.filefactory.com/file/b131bgf/n/beelden.zip
Extract following in a folder, (I supposed d:\ffmpeg folder)

Step # 2:

Run following command-line commands form your programming language exp C#.

1)      Convert to AVI first because some formats are not directly convert able into FLV
D:\FFmpeg>ffmpeg -i sample.3gp -s 470X320 -ar 44100 s22.avi
2)      Take snap from video file
D:\FFmpeg>ffmpeg -i s22.avi -ss 3 t11.jpg
3)      Convert to required FLV format
D:\FFmpeg>ffmpeg -i s22.avi -s 470X320 t11.flv
4)      fix errors using flvtool
D:\FFmpeg\>flvtool2 -UP t11.flv out2.flv

Step # 3

Download FW flash player (search it from Google)
Extract it into the same folder

Step # 4

Create a new HTML file and paste and save the following code:
<html>
<body>
<script type='text/javascript' src='swfobject.js'><script>
<div id='Div1' style="border:solid:2px:black">
    <div id='mediaspace'>This text will be replaced<div>
<div>
<script type='text/javascript'>
  var so = new SWFObject('player.swf','ply','468','348','9','#ffffff');
  so.addParam('allowfullscreen','true');
  so.addParam('allowscriptaccess', 'always');
  so.addVariable('image', 't11.jpg');
  so.addVariable('skin', 'beelden.zip');
  so.addParam('wmode','opaque');
  so.addVariable('file','out2.flv');
  so.write('mediaspace');
<script>
<body>
<html>

Step # 5

Preview your newly saved HTML in web browser.


Wednesday, April 14, 2010

Implementation of SQL IN clause in LINQ


To implement SQL IN clause in LINQ there are 4 steps


1.       GetTable from  which you need to filter rows.
2.       GetTable that contains the values(only one clumn) you need to match in IN clause.
3.       Type cast data of step # 2 DataTable column data identical to step # 1 DataTable filtering column/property.
4.       Use step# 2 DataTable’s Contains() method of step # 1 DataTable’s where caluse

public List<CustomerCoupon> getCustomerNonSpecials(int StoreID, int customerID)
        {
           
           
//Step # 1
List<CustomerCoupon> coupons = new List<CustomerCoupon>();
coupons = customerCouponsTable.Where(coupon => coupon.Customer.CustomerID == customerID).ToList();
           

//Step # 2
Table<CategoryItem> specialsTable = customersTable.Context.GetTable<CategoryItem>();
            Table<CustomerCoupon> customerCouponsTable = customersTable.Context.GetTable<CustomerCoupon>();
List<CategoryItem> specials = new List<CategoryItem>();
specials = specialsTable.Where(cItem => cItem.StoreCategory.CategoryName == cItem.Item.Store.StoreCategorys[0].CategoryName && cItem.Item.Store.StoreID == StoreID).ToList();

var query = from c in coupons
join s in specials on c.ItemID equals s.ItemID
      select new { c.Item.ItemID };

//Step # 3           
List<int> SpecialsCouponsIDs = new List<int>();
SpecialsCouponsIDs = query.ToList().ConvertAll<int>(i=> Convert.ToInt16(i.ItemID));

//Step # 4
List<CustomerCoupon> nonSpecialsCoupons =new List<CustomerCoupon>();
nonSpecialsCoupons = (from c in coupons where SpecialsCouponsIDs.Contains(c.ItemID) select c).ToList();
return nonSpecialsCoupons;
}

Followers

Search This Blog