Wednesday, October 26, 2016

Docker Swarm in CentOS 7, learn by example

Installation

1. Download CentOS 7 Minimal install ISO Image and install it on 5 machines (Could be VMs as well)
2. Set static IP address on all nodes

$cat /etc/sysconfig/network-scripts/ifcfg-ens160
 TYPE=Ethernet
BOOTPROTO=static
IPADDR=192.168.107.140
NETMASK=255.255.250.0
GATEWAY=192.168.104.1
DEFROUTE=yes
PEERDNS=yes
PEERROUTES=yes
IPV4_FAILURE_FATAL=no
IPV6INIT=yes
IPV6_AUTOCONF=yes
IPV6_DEFROUTE=yes
IPV6_PEERDNS=yes
IPV6_PEERROUTES=yes
IPV6_FAILURE_FATAL=no
NAME=ens160
UUID=012345678-2163-4bf8-850d-123456781234
DEVICE=ens160
ONBOOT=yes
3. $ service network restart 
4. $ sysctl -w net.ipv4.ip_forward=1

Install Docker Service on all machines

5. $ curl -sSL https://get.docker.com/ | sh
6. sudo systemctl stop docker

Configure instance

7. Create the directories and configuration files as


$ mkdir -p /etc/systemd/system/docker.service.d/
$ vi /etc/systemd/system/docker.service.d/http-proxy.conf
[Service]
Environment="HTTP_PROXY=http://myProxy.com:80"
$ sudo systemctl daemon-reload
$ sudo systemctl show --property Environment docker 
 Environment="HTTP_PROXY=http://myProxy.com:80"

vi /etc/systemd/system/docker.service.d/docker.conf
[Service]
ExecStart=
ExecStart=/usr/bin/dockerd -H tcp://0.0.0.0:2375 -H unix:///var/run/docker.sock
8. Check and validate instance configurations
$ sudo systemctl restart docker
$ sudo docker login
$ sudo docker run hello-world

Machine Configurations and roles


IP Fucntion Description
192.168.107.140Node 01Running containers and storing images
192.168.107.141Node 02Running containers and storing images
192.168.104.236Node 03Running containers and storing images
192.168.107.142Consul 01 & Management 01Consul: Discovery Background, Management: manage and access the Docker Swarm
192.168.104.235Node 04 & Management 02Running containers and storing images, Management: manage and access the Docker Swarm


Consul Instance Configuration

To keep things simple, we run a single consul daemon on the same host as one of the Swarm managers.

Use SSH to connect to the consul0 instance.
 $ ifconfig
From the output, copy the eth0 IP address from inet addr.
Paste the launch command into the command line:
 sysctl -w net.ipv4.ip_forward=1
 $ sudo docker run -d -p 8500:8500 --name=consul progrium/consul -server -bootstrap
Enter docker ps.
From the output, verify that a consul container is running. 

Management Instances Configuration

ssh to manager 01
$ sysctl -w net.ipv4.ip_forward=1
docker run -d -p 4000:4000 swarm manage -H :4000 --replication --advertise 192.168.107.142:4000 consul://192.168.107.142:8500
ssh to manager 02
 $ ifconfig
Start the secondary Swarm manager using following command.
 sysctl -w net.ipv4.ip_forward=1
 $ sudo docker run -d -p 4000:4000 swarm manage -H :4000 --replication --advertise 10.160.104.235:4000 consul://192.168.107.142:8500

Nodes Instances Configuration

Connect to node 1, node 2 and node 3 in turn and join them to the cluster.
 Start a Swarm container each using the following syntax:
 sysctl -w net.ipv4.ip_forward=1
 sudo docker run -d swarm join --advertise=192.168.107.140:2375 consul://192.168.107.142:8500
 sysctl -w net.ipv4.ip_forward=1
 sudo docker run -d swarm join --advertise=192.168.107.141:2375 consul://192.168.107.142:8500

 sysctl -w net.ipv4.ip_forward=1
 sudo docker run -d swarm join --advertise=192.168.104.236:2375 consul://192.168.107.142:8500
 

Test Configuration

Connect to Management 1Check Swarm information using following syntax:$ sudo docker -H :4000 info
Containers: 22
 Running: 6
 Paused: 0
 Stopped: 16
Images: 15
Server Version: swarm/1.2.5
Role: primary
Strategy: spread
Filters: health, port, containerslots, dependency, affinity, constraint
Nodes: 4
 dockerHost: 192.168.107.140:2375
  └ ID: RF2E:R27P:XFWC:2B36:DOYJ:RHRU:EIEF:NCLN:3YBY:HZ7A:RYKW:KMAT
  └ Status: Healthy
  └ Containers: 8 (1 Running, 0 Paused, 7 Stopped)
  └ Reserved CPUs: 0 / 8
  └ Reserved Memory: 0 B / 516.5 GiB
  └ Labels: kernelversion=3.10.0-327.el7.x86_64, operatingsystem=CentOS Linux 7 (Core), storagedriver=devicemapper
  └ UpdatedAt: 2016-10-27T05:07:28Z
  └ ServerVersion: 1.12.2
 localhost.localdomain: 192.168.104.236:2375
  └ ID: SP4D:OVOH:K5SF:BWNL:MRGD:EDZU:HJD6:Y5UX:DUR6:N7YD:LW5R:MTVN
  └ Status: Healthy
  └ Containers: 2 (1 Running, 0 Paused, 1 Stopped)
  └ Reserved CPUs: 0 / 1
  └ Reserved Memory: 0 B / 1.887 GiB
  └ Labels: kernelversion=3.10.0-327.el7.x86_64, operatingsystem=CentOS Linux 7 (Core), storagedriver=devicemapper
  └ UpdatedAt: 2016-10-27T05:07:16Z
  └ ServerVersion: 1.12.2
 localhost.localdomain: 192.168.107.141:2375
  └ ID: FGHH:CCLK:BTJD:PA27:6NMX:K6RQ:3ZPC:SVV4:HWML:HJYQ:MKJY:DHF4
  └ Status: Healthy
  └ Containers: 8 (2 Running, 0 Paused, 6 Stopped)
  └ Reserved CPUs: 0 / 8
  └ Reserved Memory: 0 B / 31.83 GiB
  └ Labels: kernelversion=3.10.0-327.el7.x86_64, operatingsystem=CentOS Linux 7 (Core), storagedriver=devicemapper
  └ UpdatedAt: 2016-10-27T05:07:44Z
  └ ServerVersion: 1.12.2
 localhost.localdomain: 192.168.107.142:2375
  └ ID: BM4X:XGZR:6YA5:WPVA:OKOB:ON76:3KSL:GMGI:ROPV:D2TB:VWCC:BJKB
  └ Status: Healthy
  └ Containers: 4 (2 Running, 0 Paused, 2 Stopped)
  └ Reserved CPUs: 0 / 2
  └ Reserved Memory: 0 B / 1.887 GiB
  └ Labels: kernelversion=3.10.0-327.el7.x86_64, operatingsystem=CentOS Linux 7 (Core), storagedriver=devicemapper
  └ UpdatedAt: 2016-10-27T05:07:30Z
  └ ServerVersion: 1.12.2
Plugins:
 Volume:
 Network:
Swarm:
 NodeID:
 Is Manager: false
 Node Address:
Security Options:
Kernel Version: 3.10.0-327.el7.x86_64
Operating System: linux
Architecture: amd64
CPUs: 19
Total Memory: 552.1 GiB
Name: 95d3e2eac529
Docker Root Dir:
Debug Mode (client): false
Debug Mode (server): false
WARNING: No kernel memory limit support 


Saturday, May 21, 2016

Docker Containers in Windows Server 2016 Pre Release

SQL server Express Example:

Installation:

  1. Download Windows server 2016 ISO image and install inside Virtual Box

2. Install-PackageProvider ContainerImage -Force
Once installed, a list of Base OS images can be returned using Find-ContainerImage.
Find-ContainerImage

Name                           Version          Source           Summary
----                           -------          ------           -------
NanoServer                     10.0.14300.1010  ContainerImag... Container OS Image of Windows Server 2016 Technical...
WindowsServerCore              10.0.14300.1000  ContainerImag... Container OS Image of Windows Server 2016 Technical...
3. Download WindowsServerCore and NanoServer Docker Images
Install-ContainerImage -Name NanoServer
Install-ContainerImage -Name WindowsServerCore
4. Download DockerFile for MS SQL Server Express

wget https://github.com/brogersyh/Dockerfiles-for-windows/archive/master.zip -outfile master.zip

5. Unzip Docker file and build docker image from docker file, this operation would take up to 1 hour.

expand-archive master.zip
cd master\dockerfiles-for-windows-master\sqlexpress

docker build -t sqlexpress .
docker images


6. This example demonstrate running 2 SQL Server Express instances together ruing on ports 1433 and 1434, following command with create firewall exception rules
if (!(Get-NetFirewallRule | where {$_.Name -eq "SQLServer 1433"})) { New-NetFirewallRule -Name "SQL Server 1433" -DisplayName "SQL Server 1433" -Protocol tcp -LocalPort 1433 -Action Allow -Enabled True}

if (!(Get-NetFirewallRule | where {$_.Name -eq "SQLServer 1434"})) { New-NetFirewallRule -Name "SQL Server 1434" -DisplayName "SQL Server 1434" -Protocol tcp -LocalPort 1434 -Action Allow -Enabled True} 

7. Run sqlexpress image on host post 1434 named as sql2
mkdir c:\sql
mkdir c:\sql2 


8. Connect SQL server express from network, this example using SQL Work Bench on a MAC


Tuesday, January 20, 2015

ESX/ESXi Copy Paste not working, ESXi Isolation issue


I several posts and guides I found that there is an issue that seems to be correct configuration of vmx file do not enable copy paste functionality, I finally figured out the issue.

Requirement


Enable Copy ans Paste between Virtual Machine and remote User Machine, given that VM is hosted on VMware ESX/ESXi server.

Even setting following properties in .vmx file it wont enable copy and paste

isolation.tools.copy.disable = "FALSE"
isolation.tools.paste.disable = "FALSE"


Solution

In most of the websites they do not mentioned case sensitivity requirement, for example ESXi 5.5 must required false in lower case, therefore correct property should be

isolation.tools.copy.disable = "false"
isolation.tools.paste.disable = "false"


Monday, January 19, 2015

Access Vmware ESXi guest console without runing vSphere client

There are several reasons to access remote console/desktop ESXi guest virtual machines without running vSphere client software

  1. You do not want keep your ESXi connected to vSphere while accessing a console one, because of security reasons.
  2. vSphere do not allow to get full screen console on secondary monitor.
  3. Access guest console from vSphere client is not a single step operation, and opens multiple application windows 

Depending on your installation of vSphere client your path may deffer, you can create a shortcut of Guest Console by using following command.


Command

C:\Program Files (x86)\Common Files\VMware\VMware VMRC Plug-in\Internet Explorer>vmware-vmrc -X -u root -p rootPassword -h 10.10.10.22:443 -d "[datastore1] Ubuntu 64-bit/ Ubuntu 64-bit.vmx"

Note:
Replace rootPassword with your Esxi root password, if you do not use -u and -p switch, vmware-vmrc pop up a dialog to input credentials.

Replace 10.10.10.22 with your ESXi server IP address 


Wednesday, February 6, 2013

MYSQL Enable Users or Root Remote Access Suse Linux 11.3


All you need to do is update the user table host field with % for which ever user you need to grant remote access permission.

Remember that when you remotely try to connect, if there is no connection, means Firewall or network issue, if there is an access dined error mean you need to follow the below demonstration:


TestManager:~ # mysql -u root -p
Enter password:
Welcome to the MySQL monitor.  Commands end with ; or \g.
Your MySQL connection id is 6
Server version: 5.1.46-log SUSE MySQL RPM

Copyright (c) 2000, 2010, Oracle and/or its affiliates. All rights reserved.
This software comes with ABSOLUTELY NO WARRANTY. This is free software,
and you are welcome to modify and redistribute it under the GPL v2 license

Type 'help;' or '\h' for help. Type '\c' to clear the current input statement.
mysql> use mysql;Database changed
mysql> select host,user from user;
+------------+-----------------+
| host       | user                |
+------------+-----------------+
| %          | root                  |
| %          | super_user     |
| 127.0.0.1  | root             |
| linux-npc5 |                     |
| linux-npc5 | root             |
| localhost  |                      |
| localhost  | asad            |
| localhost  | my_new_username |
| localhost  | root              |
+------------+-----------------+
9 rows in set (0.00 sec)

mysql> update user set host='%' where user='root' and host='linux-npc5';
ERROR 1062 (23000): Duplicate entry '%-root' for key 'PRIMARY'
(This error came because I have two records for user root, one is correct one is bad, let delte the bad one)
mysql> delete  from user where user='root' and host='linux-npc5';
Query OK, 1 row affected (0.00 sec)

mysql> flush privileges;
Query OK, 0 rows affected (0.00 sec)

mysql>
========================================================================

Testing from Workbench:


Tuesday, May 24, 2011

Configuring Juniper Secure Networks SA SSL-VPN


1. Add RADIUS Authentication Server
Start the Juniper Secure Networks Secure Access SSL-VPN Central Manager.
Go to Authentication - Auth. Servers
--> New RADIUS Auth Server
Configure as below


2. Custom Radius Authentication Rules
Note that "Access Challenge” has to be added where the "Reply-Message" "matches the expression" "(.*)" and in that case shows ”show GENERIC LOGIN page”. This will present the OTP field for the user.


When you're done configuring the Authentication Rules they should look like this:


3. Sign in page
Create a Sign-in page

4. User Realm
Create a User Realm that uses the Authentication Server created in step 1 for
authentication.


5. Sign In Policy

Create a Sign In Policy that uses the Sign-in Page from step 2 and the User Realm
from step 3.
Note that from the users’ perspective you can always configure the login-pages for both
graphics and text to suit your company.
6. Start testing
Go to your Juniper url and add that realm you have created. In this example juniper.nordicedge.se/test
Enter the user-id and password for the user that you have added your mobile number to.


Enter your one time password and click on “Sign In”.


Friday, April 15, 2011

The C++ 'const' Declaration: Why & How


The 'const' system is one of the really messy features of C++.
It is simple in concept, variables declared with ‘const’ added become constants and cannot be altered by the program, but, in the way is has to be used to bodge in a substitute for one of the missing features of C++, it gets horridly complicated and frustratingly restrictive. The following attempts to explain how 'const' is used and why it exists.

Simple Use of ‘const’

The simplest use is to declare a named constant. To do this, one declares a constant as if it was a variable but add ‘const’ before it. One has to initialise it immediately in the constructor because, of course, one cannot set the value later as that would be altering it. For example,
const int Constant1=96;
will create an integer constant, unimaginatively called ‘Constant1’, with the value 96.
Such constants are useful for parameters which are used in the program but are do not need to be changed after the program is compiled. It has an advantage for programmers over the C preprocessor ‘#define’ command in that it is understood & used by the compiler itself, not just substituted into the program text by the preprocessor before reaching the main compiler, so error messages are much more helpful.
It also works with pointers but one has to be careful where ‘const’ to determine whether the pointer or what it points to is constant or both. For example,
const int * Constant2
declares that Constant2 is variable pointer to a constant integer and
int const * Constant2
is an alternative syntax which does the same, whereas
int * const Constant3
declares that Constant3 is constant pointer to a variable integer and
int const * const Constant4
declares that Constant4 is constant pointer to a constant integer. Basically ‘const’ applies to whatever is on its immediate left (other than if there is nothing there in which case it applies to whatever is its immediate right).

Use of ‘const’ in Functions Return Values

Of the mixes of pointers and ‘const’, the constant pointer to a variable is useful for storage that can be changed in value but not moved in memory and the pointer (constant or otherwise) is useful for returning constant strings and arrays from functions which, because they are implemented as pointers, the program could otherwise try to alter and crash. Instead of a difficult to track down crash, the attempt to alter unalterable values will be detected during compilation.
For example, if a function which returns a fixed ‘Some text’ string is written like
char *Function1()
{ return “Some text”;}
then the program could crash if it accidentally tried to alter the value doing
Function1()[1]=’a’;
whereas the compiler would have spotted the error if the original function had been written
const char *Function1()
{ return "Some text";}
because the compiler would then know that the value was unalterable. (Of course, the compiler could theoretically have worked that out anyway but C is not that clever.)

Where it Gets Messy - in Parameter Passing

When a subroutine or function is called with parameters, variables passed as the parameters might be read from to transfer data into the subroutine/function, written to to transfer data back to the calling program or both to do both. Some languages enable one to specify this directly, such as having ‘in:’, ‘out:’ & ‘inout:’ parameter types, whereas in C one has to work at a lower level and specify the method for passing the variables choosing one that also allows the desired data transfer direction.
For example, a subroutine like
void Subroutine1(int Parameter1)
{ printf("%d",Parameter1);}
accepts the parameter passed to it in the default C & C++ way which is a copy. Therefore the subroutine can read the value of the variable passed to it but not alter it because any alterations it makes are only made to the copy and lost when the subroutine ends so
void Subroutine2(int Parameter1)
{ Parameter1=96;}
would leave the variable it was called with unchanged not set to 96.
The addition of an ‘&’ to the parameter name in C++ (which was a very confusing choice of symbol because an ‘&’ infront of variables elsewhere in C generate pointers!) like causes the actual variable itself, rather than a copy, to be used as the parameter in the subroutine and therefore can be written to thereby passing data back out the subroutine. Therefore
void Subroutine3(int &Parameter1)
{ Parameter1=96;}
would set the variable it was called with to 96. This method of passing a variable as itself rather than a copy is called a ‘reference’ in C.
That way of passing variables was a C++ addition to C. To pass an alterable variable in original C, a rather involved method using a pointer to the variable as the parameter then altering what it pointed to was used. For example
void Subroutine4(int *Parameter1)
{ *Parameter1=96;}
works but requires the every use of the variable in the called routine so altered and the calling routine altered to pass a pointer to the variable which is rather cumbersome.
But where does ‘const’ come into this? Well, there is a second common use for passing data by reference or pointer instead of copy. That is when copying a the variable would waste too much memory or take too long. This is particularly likely with large compound user-defined variable types (‘structures’ in C & ‘classes’ in C++). So a subroutine declared
void Subroutine4(big_structure_type &Parameter1);
might being using ‘&’ because it is going to alter the variable passed to it or it might just be to save copying time and there is no way to tell which it is if the function is compiled in someone else’s library. This could be a risk if one needs to trust the the subroutine not to alter the variable.
To solve this, ‘const’ can be used the in the parameter list like
void Subroutine4(big_structure_type const &Parameter1);
which will cause the variable to passed without copying but stop it from then being altered. This is messy because it is essentially making an in-only variable passing method from a both-ways variable passing method which was itself made from an in-only variable passing method just to trick the compiler into doing some optimization.
Ideally, the programmer should not need control this detail of specifying exactly how it variables are passed, just say which direction the information goes and leave the compiler to optimize it automatically, but C was designed for raw low-level programming on far less powerful computers than are standard these days so the programmer has to do it explicitly.

Messier Still - in the Object Oriented Programming

In Object Oriented Programming, calling a ‘method’ (the Object Oriented name for a function) of an object has gives an extra complication. As well as the variables in the parameter list, the method has access to the member variables of the object itself which are always passed directly not as copies. For example a trivial class, ‘Class1’, defined as
class Class1
{ void Method1();
  int MemberVariable1;}
has no explicit parameters at all to ‘Method1’ but calling it in an object in this class might alter ‘MemberVariable1’ of that object if ‘Method1’ happened to be, for example,
void Class1::Method1()
{ MemberVariable1=MemberVariable1+1;}
The solution to that is to put ‘const’ after the parameter list like
class Class2
{ void Method1() const;
  int MemberVariable1;}
which will ban Method1 in Class2 from being anything which can attempt to alter any member variables in the object.
Of course one sometimes needs to combine some of these different uses of ‘const’ which can get confusing as in
const int*const Method3(const int*const&)const;
where the 5 uses ‘const’ respectively mean that the variable pointed to by the returned pointer & the returned pointer itself won’t be alterable and that the method does not alter the variable pointed to by the given pointer, the given pointer itself & the object of which it is a method!.

Inconveniences of ‘const’

Besides the confusingness of the ‘const’ syntax, there are some useful things which the system prevents programs doing.
One in particular annoys me because my programs often need to be optimized for speed. This is that a method which is declared ‘const’ cannot even make changes to the hidden parts of its object that would not make any changes that would be apparent from the outside. This includes storing intermediary results of long calculations which would save processing time in subsequent calls to the class’s methods. Instead it either has to pass such intermediary results back to the calling routine to store and pass back next time (messy) or recalculate from scratch next time (inefficient). In later versions of C++, the ‘mutable’ keyword was added which enables ‘const’ to be overridden for this purpose but it totally relies on trusting the programmer to only use it for that purpose so, if you have to write a program using someone else's class which uses ‘mutable’ then you cannot guarantee that ‘‘mutable’ things will really be constant which renders ‘const’ virtually useless.
One cannot simply avoid using ‘const’ on class methods because ‘const’ is infectious. An object which has been made ‘const’, for example by being passed as a parameter in the ‘const &’ way, can only have those of its methods that are explicitly declared ‘const’ called (because C++’s calling system is too simple work out which methods not explicitly declared ‘const’ don’t actually change anything). Therefore class methods that don’t change the object are best declared ‘const’ so that they are not prevented from being called when an object of the class has somehow acquired ‘const’ status.

Monday, April 4, 2011

Nokia Messaging Push Email Setup on Nokia E5

There are lots of issues and problems reported about people have trouble setting up Nokia Messaging account on Nokia E5, below are the steps to follow for successful configurations: (Assuming you have Internet Setup/GPRS Configuration / WLAN done on your device)
  1. Goto Control Panel, Setting, General, Personalization, Messaging Key, Messaging Key, Short Press.
  2. Set short press to Email Setup.
  3. Exit from Control Panel and short-press the messaging key
  4. It will bring the Nokia messaging setup, enter Gamil credentials
  5. Follow the instruction and you're done
  6. Sing in to (https://email.nokia.com/account/login.action) with your step 4 Gmail credentials
  7. Setup other email account (Max 10 including first Gamil one)
  8. All of configured Email accounts are will be available on your device shortly 
  9. Perform step 1 and set short-press to default
  10. Cheers

Thursday, December 2, 2010

Getting newly generated ID auto-number values from Intersystems Cache table, by using ODBC connection provider

In Cache you need to create following Stored Procedure

===========================================================
ClassMethod MaxID(TableName as %String) As %String [ SqlProc ]
{
lastID="0"
lock +(^lastID)
//s cmd1="s ^lastID=^Sample.PersonD"
cmd1="s ^lastID=^"_TableName_"D"
XECUTE cmd1
lastID=^lastID
lock -(^lastID)
lastID

}
===========================================================

In SQL you can access it by using following SQL statement

===========================================================
Select top 1 Sample.Person_MaxID('Sample.Person') AS MaxID from Sample.Person
===========================================================


Friday, November 26, 2010

FILESTREAM storage in SQL 2008 with ASP.net MVC Part 2/2

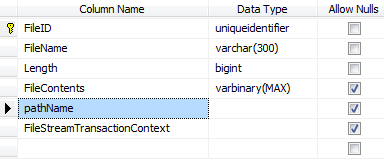
Updating FILESTREAM enabled Table for easy access in C#:

1. Open FIleSTREAM enabled table in design mode in SQL Server Management Studio

2. Add following computed properties:

PathName with formula value FileContents.pathName()


3. Add FileStreamTransactionContext with formula value get_filestream_transaction_context()


4. Save changes and accept any validation warning appeared

Creating LINQ Domain Model:

Table to class mapping:

using System;
using System.Collections.Generic;
using System.Data.Linq;
using System.Data.Linq.Mapping;
using System.Linq;
using System.Text;
using System.IO;
using System.Data.SqlTypes;

namespace FileUploadSample.Models
{
    [Table(Name = "Files")]
    public class tbl_Files
    {
       
        [Column(IsPrimaryKey = true, IsDbGenerated = false)]
        public Guid FileID { get; set; }

        [Column]
        public String FileName { get; set; }

        [Column]
        public Int64 Length { get; set; }
        [Column(Name = "pathName", IsDbGenerated = true, AutoSync = AutoSync.OnInsert)]
        private String _PathName { get; set; }

        [Column(Name = "FileStreamTransactionContext", IsDbGenerated = true, AutoSync = AutoSync.OnInsert)]
        private byte[] _FileStreamTransactionContext { get; set; }

        public String PathName
        {
            get
            {
                return this._PathName;
            }
        }

        public byte[] FileStreamTransactionContext
        {
            get
            {
                return this._FileStreamTransactionContext;
            }
        }       
       
    }
}


SQL Repository:

using System;
using System.Collections.Generic;
using System.Linq;
using System.Web;
using System.IO;
using FileUploadSample.Controllers;
using System.Data.Linq;
using System.Transactions;
using System.Data.SqlTypes;
using System.Data.SqlClient;
using System.Data;


namespace FileUploadSample.Models
{

    public class tbl_FilesRepository
    {
        private String connectionString;
        private Table<tbl_Files> FileTable;
        private DataContext FilesContext;
        public tbl_FilesRepository(string connectionString)
        {
            FilesContext = new DataContext(connectionString);
            FileTable = FilesContext.GetTable<tbl_Files>();
            //FileTable = (new DataContext(connectionString)).GetTable();
            this.connectionString = connectionString;

        }

        public Table<tbl_Files> getTable()
        {
            return FileTable;
        }
        public void Addfile(tbl_Files ObjFile)
        {
            FileTable.InsertOnSubmit(ObjFile);
            FileTable.Context.CommandTimeout = 3600;
            FileTable.Context.SubmitChanges();

        }
        public void downloadFileStream(Guid id, HttpResponseBase Response)
        {
           
            using (TransactionScope ts = new TransactionScope())
            {
                var selectedFile = FileTable.Where(Tfile => Tfile.FileID == id).FirstOrDefault();
                SqlFileStream sqlFile = new SqlFileStream(((SqlString)selectedFile.PathName).Value, ((SqlBinary)selectedFile.FileStreamTransactionContext).Value, System.IO.FileAccess.Read);


                if (selectedFile != null)
                {
                  

                    // Buffer to read 10K bytes in chunk:
                    byte[] buffer = new Byte[1024 * 512]; //512 KB

                    // Length of the file:
                    int length;

                    // Total bytes to read:
                    long dataToRead;

                    try
                    {
                    
                        // Total bytes to read:
                        dataToRead = sqlFile.Length;

                        Response.ContentType = "application/octet-stream";
                        Response.AddHeader("Content-Disposition", "attachment; filename=" + selectedFile.FileName);

                        // Read the bytes.
                        while (dataToRead > 0)
                        {
                            // Verify that the client is connected.
                            if (Response.IsClientConnected)
                            {
                                // Read the data in buffer.
                                length = sqlFile.Read(buffer, 0, 1024 * 512);

                                // Write the data to the current output stream.
                                Response.OutputStream.Write(buffer, 0, length);

                                // Flush the data to the HTML output.
                                Response.Flush();

                                buffer = new Byte[1024 * 512];
                                dataToRead = dataToRead - length;
                            }
                            else
                            {
                                //prevent infinite loop if user disconnects
                                dataToRead = -1;
                            }
                        }
                        ts.Complete();
                    }
                    catch (Exception ex)
                    {
                        // Trap the error, if any.
                        Response.Write("Error : " + ex.Message);
                        ts.Dispose();
                    }
                    finally
                    {
                        if (sqlFile != null)
                        {
                            //Close the file.
                            sqlFile.Close();
                            Response.Close();
                        }
                       
                    }
                }
            }
        }

        public bool uploadStream(HttpRequestBase Request)
        {
            foreach (string inputTagName in Request.Files)
            {
                HttpPostedFileBase file = Request.Files[inputTagName];
                if (file.ContentLength > 0)
                {
                    SqlFileStream sqlFile = null;
                    using (TransactionScope ts = new TransactionScope())
                    {
                        try
                        {
                            FileUploadSample.Models.tbl_Files objFile = new FileUploadSample.Models.tbl_Files();
                            objFile.FileName = file.FileName.Split('\\')[file.FileName.Split('\\').Length - 1]; ;
                            objFile.Length = Convert.ToInt64(file.ContentLength / 1024);
                            objFile.FileID = Guid.NewGuid();
                            //objFile.FileContents = new byte[0];
                            Addfile(objFile);

                            //Save file on FILESTREAM                        
                            sqlFile = new SqlFileStream(((SqlString)objFile.PathName).Value, ((SqlBinary)objFile.FileStreamTransactionContext).Value, System.IO.FileAccess.Write);
                            byte[] buffer = new byte[1024 * 1024]; // 512Kb
                            int bytesRead = file.InputStream.Read(buffer, 0, buffer.Length);
                            while (bytesRead > 0)
                            {
                                sqlFile.Write(buffer, 0, bytesRead);
                                bytesRead = file.InputStream.Read(buffer, 0, buffer.Length);
                            }
                            
                            ts.Complete();
                            return true;
                           
                        }
                        catch (Exception ex)
                        {
                           
                            ts.Dispose();
                            return false;
                        }
                        finally
                        {
                            if (sqlFile != null)
                                sqlFile.Close();

                        }
                      
                    }
                   
                }
           }// For Each Loop
            return false; // If this LOC is reached that means there is no valid file to upload.
        }//Method uploadStream()

    }
}


Creating View:


<%@ Page Title="" Language="C#" MasterPageFile="~/Views/Shared/Site.Master" Inherits="System.Web.Mvc.ViewPage>" %>

<asp:Content ID="Content1" ContentPlaceHolderID="TitleContent" runat="server">
    Index
asp:Content>
<asp:Content ID="Content2" ContentPlaceHolderID="MainContent" runat="server">
    <script type="text/javascript">
        $(function () {
            $("#dialog").dialog({
                bgiframe: true,
                height: 140,
                modal: true,
                autoOpen: false,
                resizable: false
            })
        });
       
    script>
   
   
    <h2>
        Indexh2>
    <div id="dialog" title="Upload files">
        <% using (Html.BeginForm("UploadFileStream", "File", FormMethod.Post, new { enctype = "multipart/form-data" }))
           {%>
        <p>
            <input type="file" id="fileUpload" name="fileUpload" size="23" />
        p>
        <p>
            <input type="submit" value="Upload file" />p>
        <% } %>
    div>
    <a href="#" onclick="jQuery('#dialog').dialog('open'); return false">Upload Filea>
    <br />
    <br />
    <br />
    <table width="100%">
        <tr>
            <th>
                Name
            th>
            <th>
                File Url
            th>
            <th>
                Uploaded Date
            th>
            <th>
                Size
            th>
           
        tr>
        <% foreach (var item in Model)
           {
               string fileType = System.IO.Path.GetExtension(item.FileName);
        %>
        <tr>
            <td>
                <%= Html.Encode(item.FileName)%>
            td>
            <td style="vertical-align: middle">
                <a href='<%= Html.Encode("/file/downloadFileStream/"+item.FileID)%>'>Download a>
            td>
            <td style="vertical-align: middle">
             
            td>
            <td style="vertical-align: middle">
                <%= Html.Encode(item.Length) + " KB" %>
            td>
          
        tr>
        <% } %>
    table>
asp:Content>


Creating Controller:

Note:We must have to use Integrated Security=True in connection string

using System;
using System.Collections.Generic;
using System.Linq;
using System.Web;
using System.Web.Mvc;
using System.Web.Mvc.Ajax;
using FileUploadSample.Models;
using System.IO;
using System.Data.Linq;

namespace FileUploadSample.Controllers
{
       public class FileController : Controller
    {
       
        static String connectionString = "Data Source=ASAD-PC-DESKTOP\\SQLSERVER_R2;Initial Catalog=CSAFMS;Integrated Security=True";
    
        FileRepository fileRepository = new FileRepository(connectionString);
        tbl_FilesRepository tbl_FilesRepository = new tbl_FilesRepository(connectionString);

        public ActionResult Index()
        {
            return View(tbl_FilesRepository.getTable().ToList());
        }
       
        public ActionResult downloadFileStream(Guid id)
        {           
            tbl_FilesRepository.downloadFileStream(id, Response);
            return View();
        }
               
        public void UploadFileStream()
        {
            tbl_FilesRepository.uploadStream(Request);
            Response.Redirect("~/File");
        }
    }
}


Source download password (asadyousufi.blogspot.com)

Followers

Search This Blog